
Digital story telling can be an engaging activity to incorporate in the classroom. Digital story telling involves using digital media and tools to tell a story. This can be implemented to develop the personal voices of students or to reinforce or enrich the curriculum in almost any content area classroom. Some of the benefits include developing technology skills, exploring content at a greater depth, enhancing communication and practicing literacy skills.
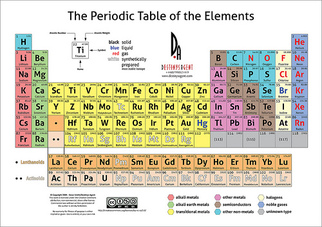
I have brainstormed many different ways to utilize this medium for learning. I used to teach history, which is an entire curriculum based on stories. Digital stories would easily be incorporated into the history classroom. This type of project is also adaptable to the Science curriculum. In Life Science, you could do the story of a cell or of the different organelles. I teach Physical Science and Chemistry, so I am going to plan a project based on the Elements of the Periodic Table. Each pair of students will be assigned a different element with the objective of telling the story of the element, from its’ birth and its atomic arrangement to its discovery, uses and potential future uses. This relates directly to the Science Core Standards in my curriculum, as wells as the NETS-S standards for technology integration.
I have brainstormed many different ways to utilize this medium for learning. I used to teach history, which is an entire curriculum based on stories. Digital stories would easily be incorporated into the history classroom. This type of project is also adaptable to the Science curriculum. In Life Science, you could do the story of a cell or of the different organelles. I teach Physical Science and Chemistry, so I am going to plan a project based on the Elements of the Periodic Table. Each pair of students will be assigned a different element with the objective of telling the story of the element, from its’ birth and its atomic arrangement to its discovery, uses and potential future uses. This relates directly to the Science Core Standards in my curriculum, as wells as the NETS-S standards for technology integration.
Required Media
The development of this product will be based in Microsoft Movie Maker, but I will allow students to use any digital video editor for this project including PhotoStory and iMovie. I will allow them to try Animoto, but I would not encourage it due to the price. I would also probably allow my standard students to use PowerPoint, especially since they are familiar with this program and can easily integrate the presentation into Movie Maker. Photoshop, or a similar picture editor, could also be useful.
Plan for the Project
1. Create a Wiki or a curriculum page for project resources that are accessible to students.
2. Show sample digital stories and have students analyze them. I will show an example of a personal digital story, an example of an element story and a poor example of a digital story. Students will examine these samples and discover the themes and other elements of digital stories. See a sample student created digital story below:
3. Provide students with a Rubric and access to the Wiki or curriculum page so they can view the project resources and requirements. Some required elements may include transitions, photographs, drawings, audio, captions, etc., in addition to the content requirements relating to the assigned Element.
4. Assign the Elements (topics) to the students and provide planning templates, such as graphic organizers, or story boards and examples.
5. Review the students’ story boards or plans and, if necessary, suggest modifications.
6. Provide instruction on how to create the product. This may include:
7. Students create the digital stories for their Elements.
8. Students will save the final project to a shared drive with ample storage space or they will upload the project to a capable web host.
9. Evaluate the projects using a scale or rubric.
There are many web resources available for digital story telling. In addition to those listed above, some useful websites with Science-related resources include:
-https://sites.google.com/site/sciencedigitalstories/home
-http://www.debraaustin.info/k12tech/digital.htm
-http://net.educause.edu/ir/library/pdf/eli08167b.pdf
-http://web2012.discoveryeducation.com/blog/index.cfm/2011/4/27/Digital-Storytelling-20-Connect-create-and-collaborate
There are also some resources that I will be creating. I will be adapting a rubric for this project that incorporates both content and technology competencies. I will also need to create and update a Wiki or curriculum page for this project. I will need to create my own instructions for each stage of this project. I will also need to develop my own sample of a finished product to share with the students.
I am looking forward to implementing this project in my classroom. I would appreciate any feedback, suggestions or any ideas that you have related to digital story telling in the classroom.
-------------------------------------------------------------------------------------------------------------------------------------
Image 1: This work by Phillip Martin is licensed under a Creative Commons Attribution-NonCommercial-NoDerivs 3.0 Unported License.
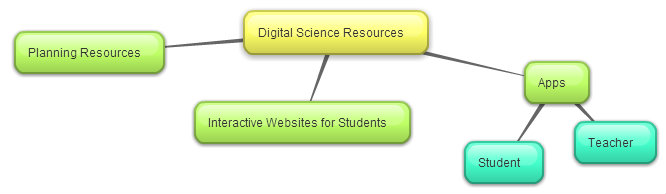
Image 2: This work by Destinys Agent is licensed under a Creative Commons License and is hosted on Flickr.com.
4. Assign the Elements (topics) to the students and provide planning templates, such as graphic organizers, or story boards and examples.
5. Review the students’ story boards or plans and, if necessary, suggest modifications.
6. Provide instruction on how to create the product. This may include:
- how to save files together in the same folder
- how to incorporate images and other types of media
- how to use the story telling program
7. Students create the digital stories for their Elements.
8. Students will save the final project to a shared drive with ample storage space or they will upload the project to a capable web host.
9. Evaluate the projects using a scale or rubric.
There are many web resources available for digital story telling. In addition to those listed above, some useful websites with Science-related resources include:
-https://sites.google.com/site/sciencedigitalstories/home
-http://www.debraaustin.info/k12tech/digital.htm
-http://net.educause.edu/ir/library/pdf/eli08167b.pdf
-http://web2012.discoveryeducation.com/blog/index.cfm/2011/4/27/Digital-Storytelling-20-Connect-create-and-collaborate
There are also some resources that I will be creating. I will be adapting a rubric for this project that incorporates both content and technology competencies. I will also need to create and update a Wiki or curriculum page for this project. I will need to create my own instructions for each stage of this project. I will also need to develop my own sample of a finished product to share with the students.
I am looking forward to implementing this project in my classroom. I would appreciate any feedback, suggestions or any ideas that you have related to digital story telling in the classroom.
-------------------------------------------------------------------------------------------------------------------------------------
Image 1: This work by Phillip Martin is licensed under a Creative Commons Attribution-NonCommercial-NoDerivs 3.0 Unported License.
Image 2: This work by Destinys Agent is licensed under a Creative Commons License and is hosted on Flickr.com.
 RSS Feed
